How To Paint A Concrete Garage Floor In Columbus, Ohio – Painting Company In Columbus, Ohio
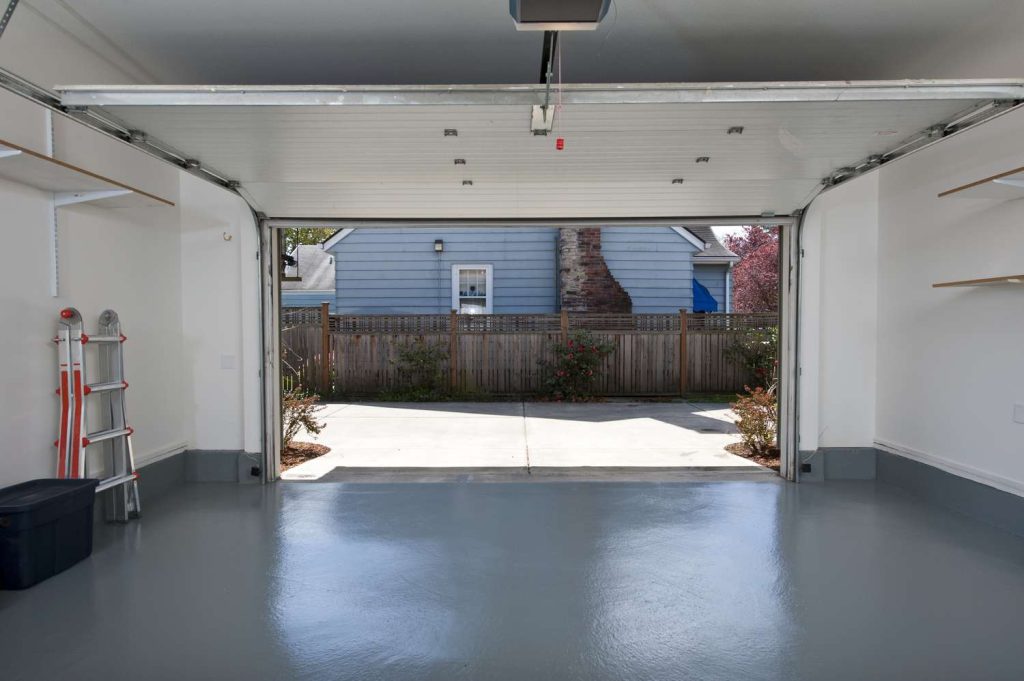
A coated garage floor can make the entire space look brighter, cleaner, and more finished—while also helping protect the concrete from stains, dusting, and everyday wear. The key is doing the “unseen” work first: cleaning, surface profiling, and confirming the slab is ready to accept a coating.
In Columbus, temperature swings and seasonal moisture can be tough on coatings, so choosing the right system and following cure times is just as important as how it looks on day one.
Why garage floor coatings peel
Most failures trace back to adhesion problems—usually from oil residue, leftover dust, smooth/troweled concrete that wasn’t profiled, or moisture vapor pushing up through the slab after coating. These issues can show up as bubbles, flaking, or sheets of coating lifting off.
If a garage floor is prepped correctly, even a DIY-friendly system performs far better than a premium coating placed over a dirty or slick surface.
Best coating choices for Columbus garages
Here are the most common options homeowners consider:
-
Concrete floor paint (1-part): Easiest to apply, but typically the lowest durability under hot tires and frequent parking.
-
Two-part epoxy kits: Stronger and more resistant to chemicals than basic paint when installed over properly prepared concrete.
-
Professional multi-layer systems: Often include grinding, testing, and higher-performance coatings for longer service life.
Tools and materials
Have these ready before starting:
-
Concrete cleaner/degreaser, stiff scrub brush, hose or pressure washer
-
Crack repair/patch product suitable for concrete
-
Etching solution or mechanical grinding method to create a bonding profile
-
Painter’s tape + plastic sheeting (protect walls and doors)
-
Primer (if required by your coating system)
-
Coating product (epoxy or other garage-floor-rated coating) + optional decorative flakes
-
Roller, extension pole, edging brush, mixing bucket/paddle
-
Gloves, eye protection, ventilation fans
Step-by-step: Paint a concrete garage floor
1) Empty the garage and evaluate the slab
Remove everything. Check for peeling old paint, tire marks, oil spots, and cracks—anything loose must be removed or it can cause the new coating to fail.
2) Deep clean and degrease
Scrub thoroughly and rinse well. Any grease or residue left behind can block bonding and shorten the life of the finish.
3) Patch cracks and damage
Repair cracks/spalls and let repairs cure fully according to the product directions so the coating isn’t applied over soft or shrinking material.
4) Check for moisture risk
Concrete can contain moisture below the surface; if vapor moves upward after coating, it can contribute to blistering or delamination. If moisture is suspected or the slab has a history of dampness, address it before proceeding.
5) Profile the surface
Coatings need a surface they can “grab.”
-
Etch method: Etching helps open the surface and improve adhesion; rinse thoroughly and remove residue.
-
Grinding method: Mechanical profiling is often preferred for consistent results, especially on dense concrete.
After profiling, allow the slab to dry completely.
6) Prime if your system requires it
Primer can improve bond and promote more uniform coverage. Apply evenly and follow the dry-time window listed for your product.
7) Apply the base coat
Mix only what can be used within the working time. Cut in edges first, then roll the field in sections, maintaining a wet edge for a consistent finish.
Optional flakes: For a more decorative look, broadcast flakes while the coating is still wet so they embed properly.
8) Seal with a topcoat
A clear topcoat can add protection and help the floor resist stains and wear—especially important in a garage that sees water, salt, and chemical exposure. Many systems specify a second coat or clear protective layer after the base coat sets.
9) Respect cure times
Avoid foot traffic and keep cars off the floor until the coating reaches the recommended cure stage. Short-cutting cure time is a common reason coatings mark, soften, or peel early.
Columbus-specific tips
-
Plan the project when temperatures are stable and conditions allow proper drying and curing; moisture sensitivity is a known factor in coating performance.
-
Pay close attention to the garage opening where water and winter slush often collect—this is a high-risk zone for moisture and wear.
When to hire a pro
Consider professional help if the slab has persistent moisture, heavy contamination, old failing coatings, or you want a longer-life system installed with grinding and testing. Professional systems commonly emphasize profiling and moisture evaluation to reduce failure risk.
Final Words
As a reminder, painting your concrete garage floor in Columbus, Ohio, requires thorough preparation and attention to detail to ensure lasting results. You’ll want to clean and etch the surface properly, work in sections, and use the right coating techniques to achieve a smooth, durable finish. Taking these steps will improve your garage’s appearance and protect your floor from wear and stains. If you prefer expert assistance, 3S Painting is here to help make your project hassle-free and successful. Visit 3S Painting to learn more about professional garage floor painting in your area.
FAQ
How many days should be set aside for a garage floor coating project?
Most garage floor jobs take longer than a single day because the slab must be cleaned, profiled (etch/diamond grind), dried, coated, and then allowed to cure before vehicles return. Many coating systems also require specific recoat windows, so timing matters as much as application.
Do you always need to etch concrete before painting?
Concrete needs the right surface texture for the coating to grip, and etching is one way to create that profile on certain slabs. Some floors (or coating systems) may be better served with mechanical profiling instead, especially when consistent adhesion is the goal.
What coating holds up best for daily parking and chemical spills?
Two-part epoxy systems are commonly chosen for garages because they’re formulated for better durability and chemical resistance than basic floor paints when installed over properly prepared concrete. For maximum lifespan, many homeowners step up to multi-layer systems with additional protection.
Why do garage floor coatings blister, flake, or peel?
The usual culprits are oil/grease contamination, leftover dust, insufficient surface profiling, or moisture vapor rising through the concrete after the coating is applied. Addressing cleanliness, profiling, and moisture risk up front is the best way to prevent these failures.
Is a clear topcoat really necessary?
A topcoat is often recommended because it adds another layer of protection against abrasion, stains, and wear, and it can also improve cleanability. Many systems include or specify a protective top layer as part of the complete install.

James Schrienk, a resident of Columbus, OH, is the proud owner of 3S Painting. With a wealth of experience in managing businesses of various scales, his expertise lies in project and people management. Jim thrives in team environments, always focusing on labor efficiency and delivering high-quality client results. His leadership style and practical communication skills have made him an exceptional manager and a driving force behind the success of 3S Painting. When he’s not leading his team to excellence, Jim enjoys continuously exploring innovative strategies to improve customer satisfaction.